Mar 03, 2023
Welcome to the second entry in our new sequence of jargon-busting posts, geared toward these of you simply beginning out in your pictures journeys. On this sequence, we’ll be making an attempt to demystify some phrases that you simply’ll hear being bandied about in pictures circles which may depart you scratching your head.
These are ideas it’ll assist you to to be aware of and which we’ll be explaining in broad phrases to be able to develop a basic understanding, with out getting slowed down within the technicalities.
This time, we’re wanting on the variations between capturing in JPG and RAW codecs, and what this implies to our pet pictures.
The final gist:
- RAW information include much more information than JPGs
- Capturing RAW information leaves the creative decisions to the artist
- RAW information are typically far bigger than JPGs
- RAW information are often not shared with shoppers exterior of some business agreements
- Opening, enhancing and saving JPGs degrades their high quality
Let’s take a second earlier than diving deeper and repeat one of many issues that we talked about within the earlier Jargon Busters publish.
There shall be individuals who attempt to let you know that “skilled photographers” all the time shoot RAW. That in the event you shoot JPG, you aren’t an expert. As we stated in our earlier publish on full body vs crop sensor cameras (hyperlink), that is merely not true. We imagine that capturing RAW is the only option for pet pictures in pure gentle, and gained’t attempt to disguise that reality – in reality, we’ll be supplying you with all of the the explanation why we imagine this to be the case as this publish progresses. Nonetheless, there are causes in different genres (exterior the scope of this weblog) that imply that capturing in JPG might not be the horror that some individuals imagine it to be.
We encourage you, all the time, to maintain an open thoughts, and whenever you hear a polarising assertion, look past that and realise that everybody has their very own utility, so their very own wants. That stated, let’s get this present on the street!
To know the distinction between capturing your pictures in RAW or JPG, let’s go proper again to the very begin and examine what occurs inside your digital camera whenever you hit the shutter.
Throughout that break up second when the shutter is open, a picture of the scene is funneled by means of your lens onto the digital camera’s sensor, as pure information. No matter whether or not you’re capturing in RAW or capturing in JPG, the picture begins off life as a set of ones and zeroes. Nothing like an precise {photograph}!
These ones and zeros include every kind of details about the picture and decide the publicity, white steadiness, distinction, sharpness, noise and the rest you’ll be able to consider.
Consider it as your digital camera heading to the grocery retailer and grabbing all the pieces it may presumably have to bake a cupcake. All of the substances are saved proper there in that non permanent file that it creates whenever you hit the shutter.
Relying on what you select to “shoot in” (RAW, JPG and even each) will decide how that uncooked information is collated and what sort of file is definitely saved onto your reminiscence card instantly after the picture information is captured.
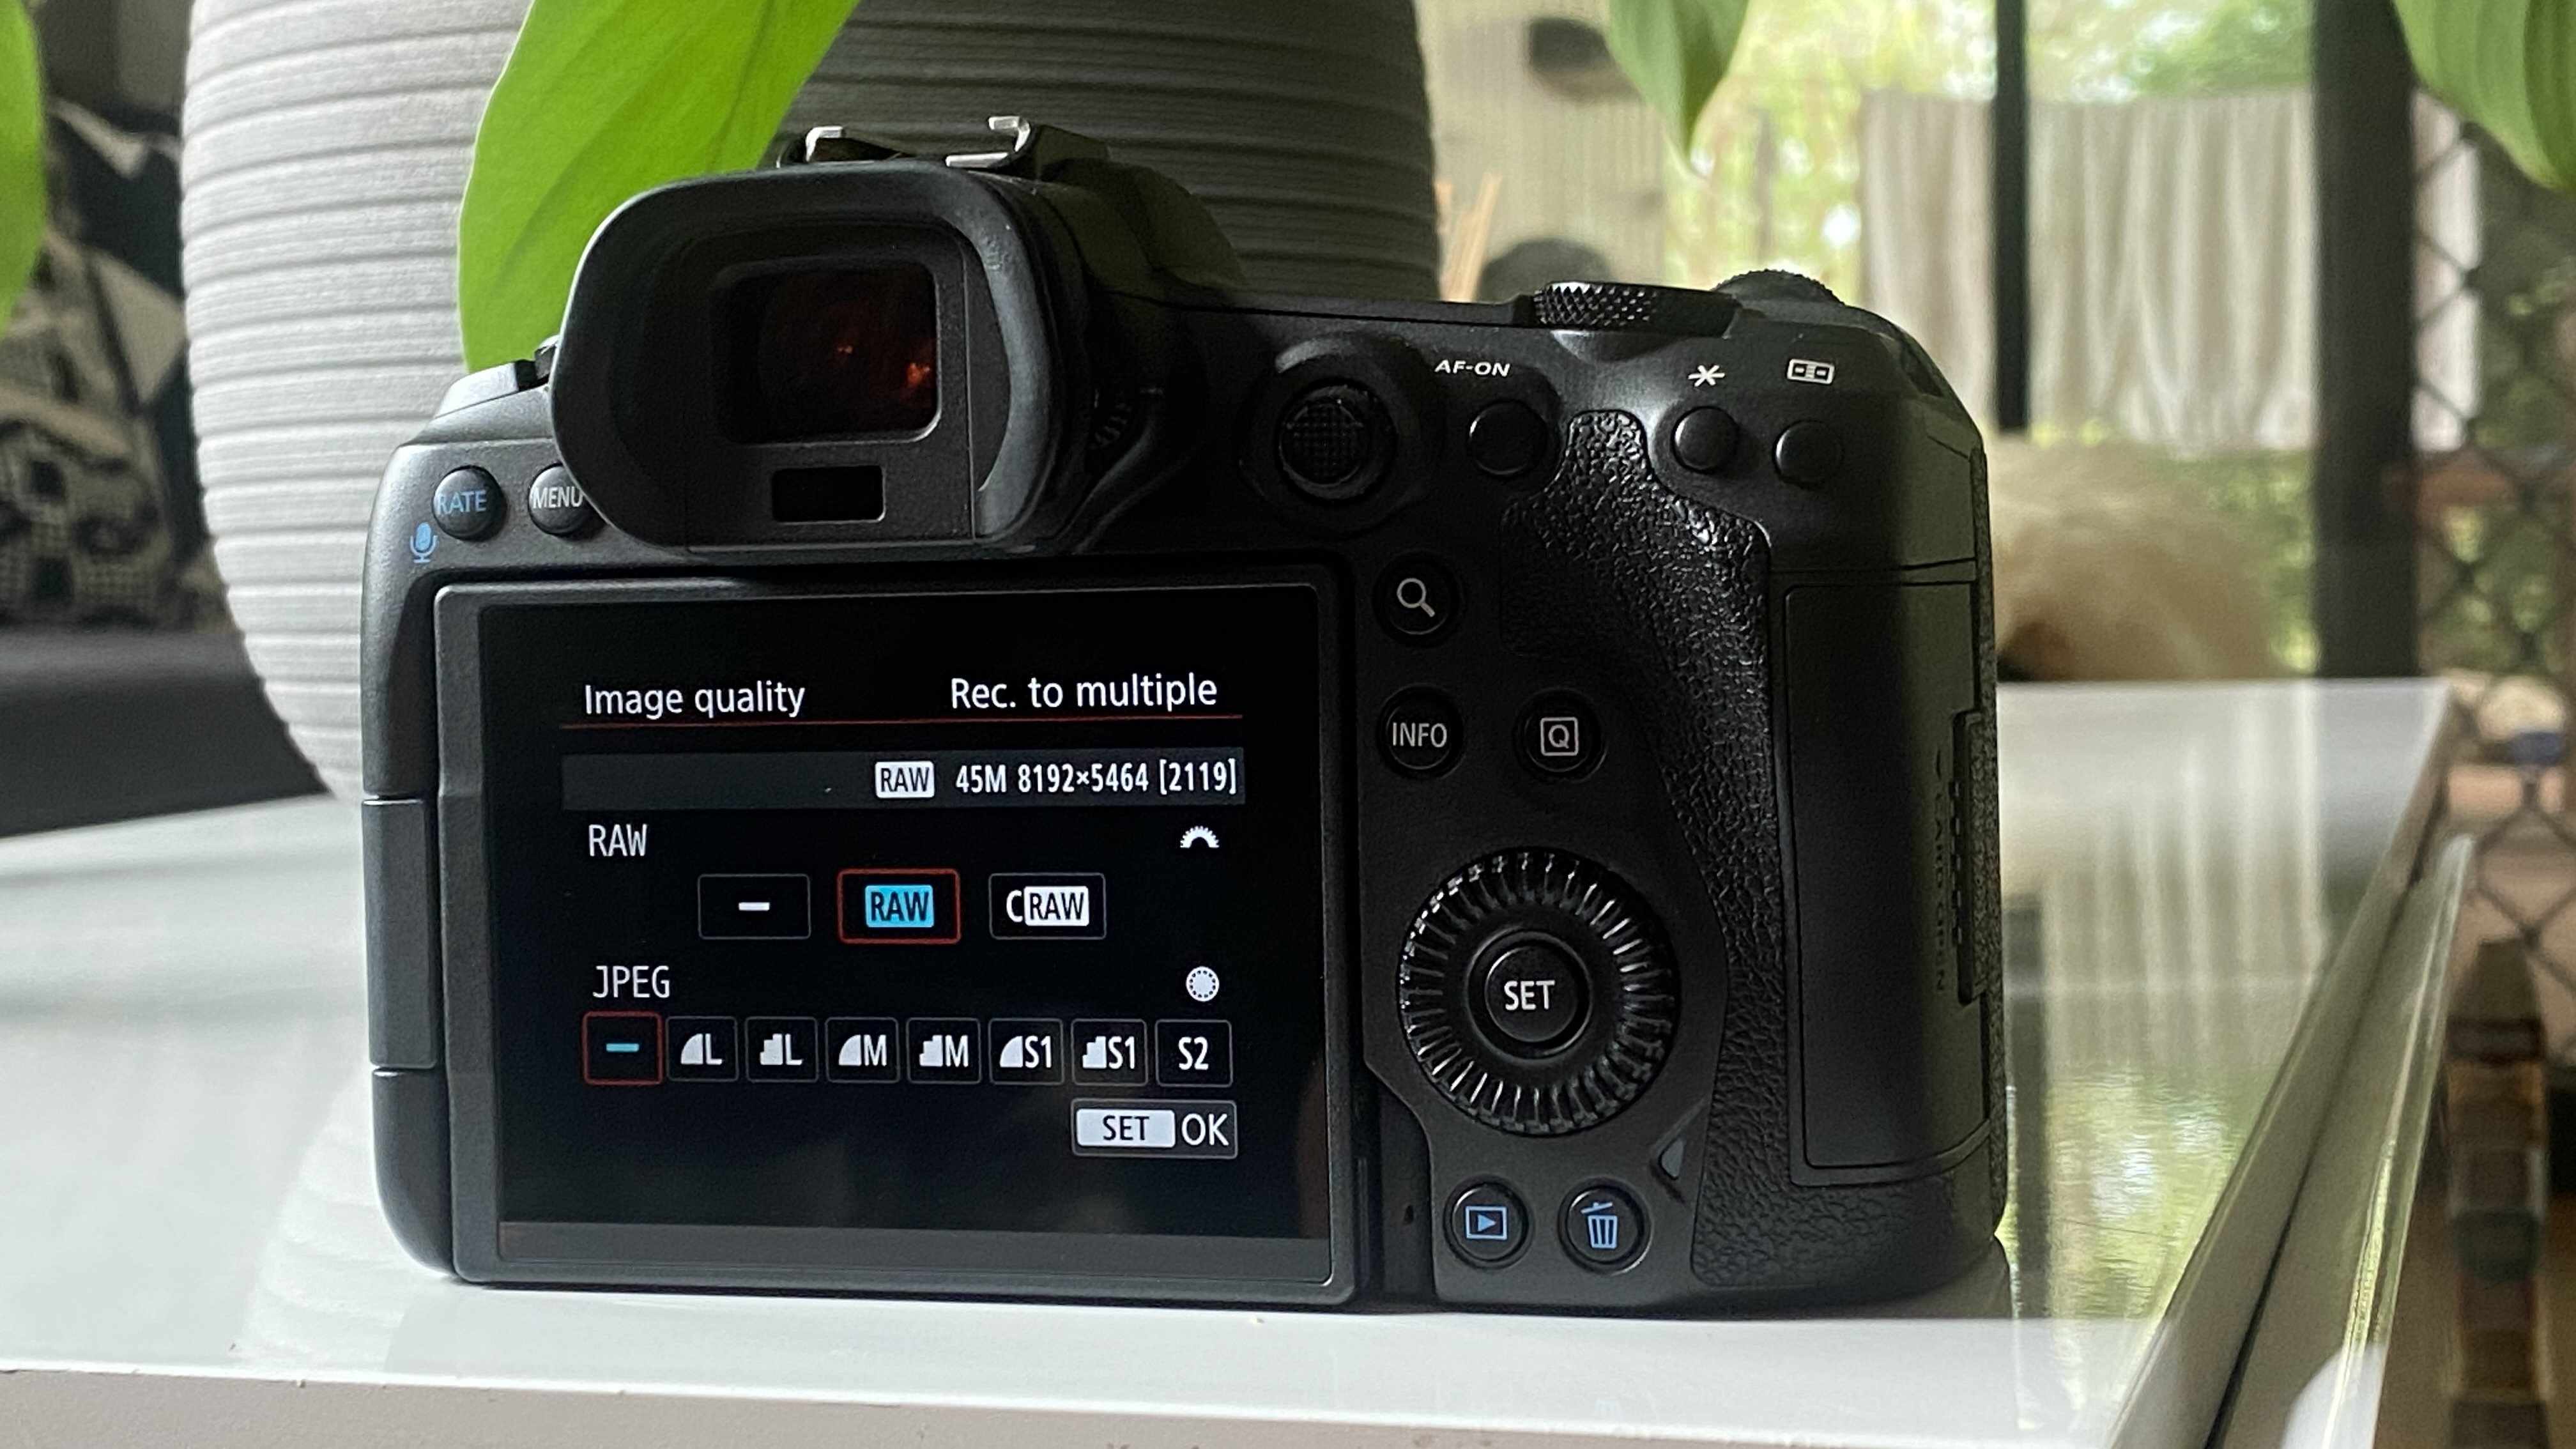
Most fashionable DSLR or mirrorless cameras will mean you can choose which format (or codecs) to shoot in, with a variety of sizes and qualities accessible for capturing a JPG picture.
So what occurs whenever you shoot in JPG?
Your digital camera (with a bit enter from the settings you select – extra about these later) immediately decides on a recipe to make use of, goes forward and converts all that information into a picture file referred to as a JPG, and saves it in your reminiscence card – ta da! Finished!
So all these uncooked substances? It’s chosen those that it needs to make use of, and baked these substances into the completed cupcake. It’s a reasonably fundamental cupcake and there’s no icing. And the way wasteful – all of the unused substances are merely thrown away!
The issue is, in case your digital camera forgets so as to add the sugar, or if the cupcakes had been left within the oven for a bit too lengthy and are burnt on the underside, you’re just about caught with the outcome. You possibly can’t add sugar right into a baked cupcake, and all you’ll be able to actually do is minimize off the burned bit on the underside, which isn’t nice for presentation! And you may most likely add some icing later, however the cupcake itself nonetheless tastes fairly plain.
So what’s good a couple of JPG?
Similar to cupcakes, JPG information are simple to bundle up and share with individuals. Some cameras may even share the photographs wirelessly straight to your cellphone. They’re typically small information that don’t take up a lot house in your reminiscence card or laborious drive. They are often immediately uploaded to social media, displayed on a web site, and considered on any gadget, with out you needing to transform to a unique format.
An important issue is that they’ll look the identical on each piece of software program and gadget they’re opened on (with out falling down the rabbit-hole of display calibration for now).
JPG’s are nice for all these causes, however they must be correctly baked to end in a pleasant finish outcome.
Now let’s have a look at what occurs whenever you shoot in RAW.
We’ve already realized that when the picture is captured by the digital camera, it’s really simply collected a stack of uncooked data out of your digital camera’s sensor. When it creates the RAW file, it masses all these substances into buying baggage filled with all the pieces you can presumably have to bake a cake – or some other sort of scrumptious baked items you’ll be able to consider – and fingers them over!
So a RAW file isn’t really a picture file in any respect. Slightly, it’s a knowledge file! The picture you view each on the again of your digital camera, and on the pc, is only a quite simple visible interpretation of the info so you’ll be able to see what you’ve captured. It’s not a completed picture (or a properly baked cake) in any respect.
So what can we do with all these uncooked substances?
Loading that RAW file into an app or pc program that understands all that uncooked information (like Lightroom or Adobe Digital camera Uncooked) is rather like coming into the kitchen, arms laden with baggage filled with substances.
Straight from the digital camera, we now have all of the substances within the RAW file to make all kinds of decisions on easy methods to current the ultimate picture.
Be a part of us within the Unleashed kitchen! We’re donning our aprons and are about to begin baking. In entrance of us on the counter we now have all the pieces we’d have to create any kind of baked deliciousness. There’s three kinds of flour, baking powder, sugar, salt, a field of eggs and a packet of butter. There’s jam, buttercream, icing, chocolate chips and sprinkles.
Now for the enjoyable half – it’s as much as us to decide on which components we wish to embody, easy methods to put them collectively, and the way a lot of every ingredient we wish to use. Are we making cookies, muffins, or a Victoria sponge cake? What decorations are we going so as to add? On a regular basis these substances keep on the counter, they’ve the likelihood to be became so many alternative issues. Likewise, our RAW file is stuffed with potential, with so many attainable methods we will course of it.
In fact, in an actual life kitchen, as quickly as we begin to play with our substances, they’re without end certain collectively. With RAW information, this isn’t the case. Our RAW editors are actually sensible – what they do is enable us to check issues out with out really altering the underlying RAW file. After we add a little bit of this (heat, say), and blend in a splash of that (further distinction, maybe), we see on display a preview of what our ultimate baked good will appear like, however all they’re doing is writing the recipe. They’re not really mixing something whereas we play, and the editor isn’t really altering the unique RAW file in any respect. If we resolve after including a complete host of substances that, in reality, we might quite have much less heat, we will take it out once more with none penalty.
We are able to transfer these ingredient sliders as a lot as we would like, previewing what the tip outcome shall be on the display, but when we by accident add a bit an excessive amount of of one thing, no trouble, as a result of we’re solely writing the recipe. No eggs are being damaged.
As soon as we now have tweaked our recipe sufficient to have the proper finish outcome, we will inform Lightroom to bake that child up into our JPG, and export it for sharing.
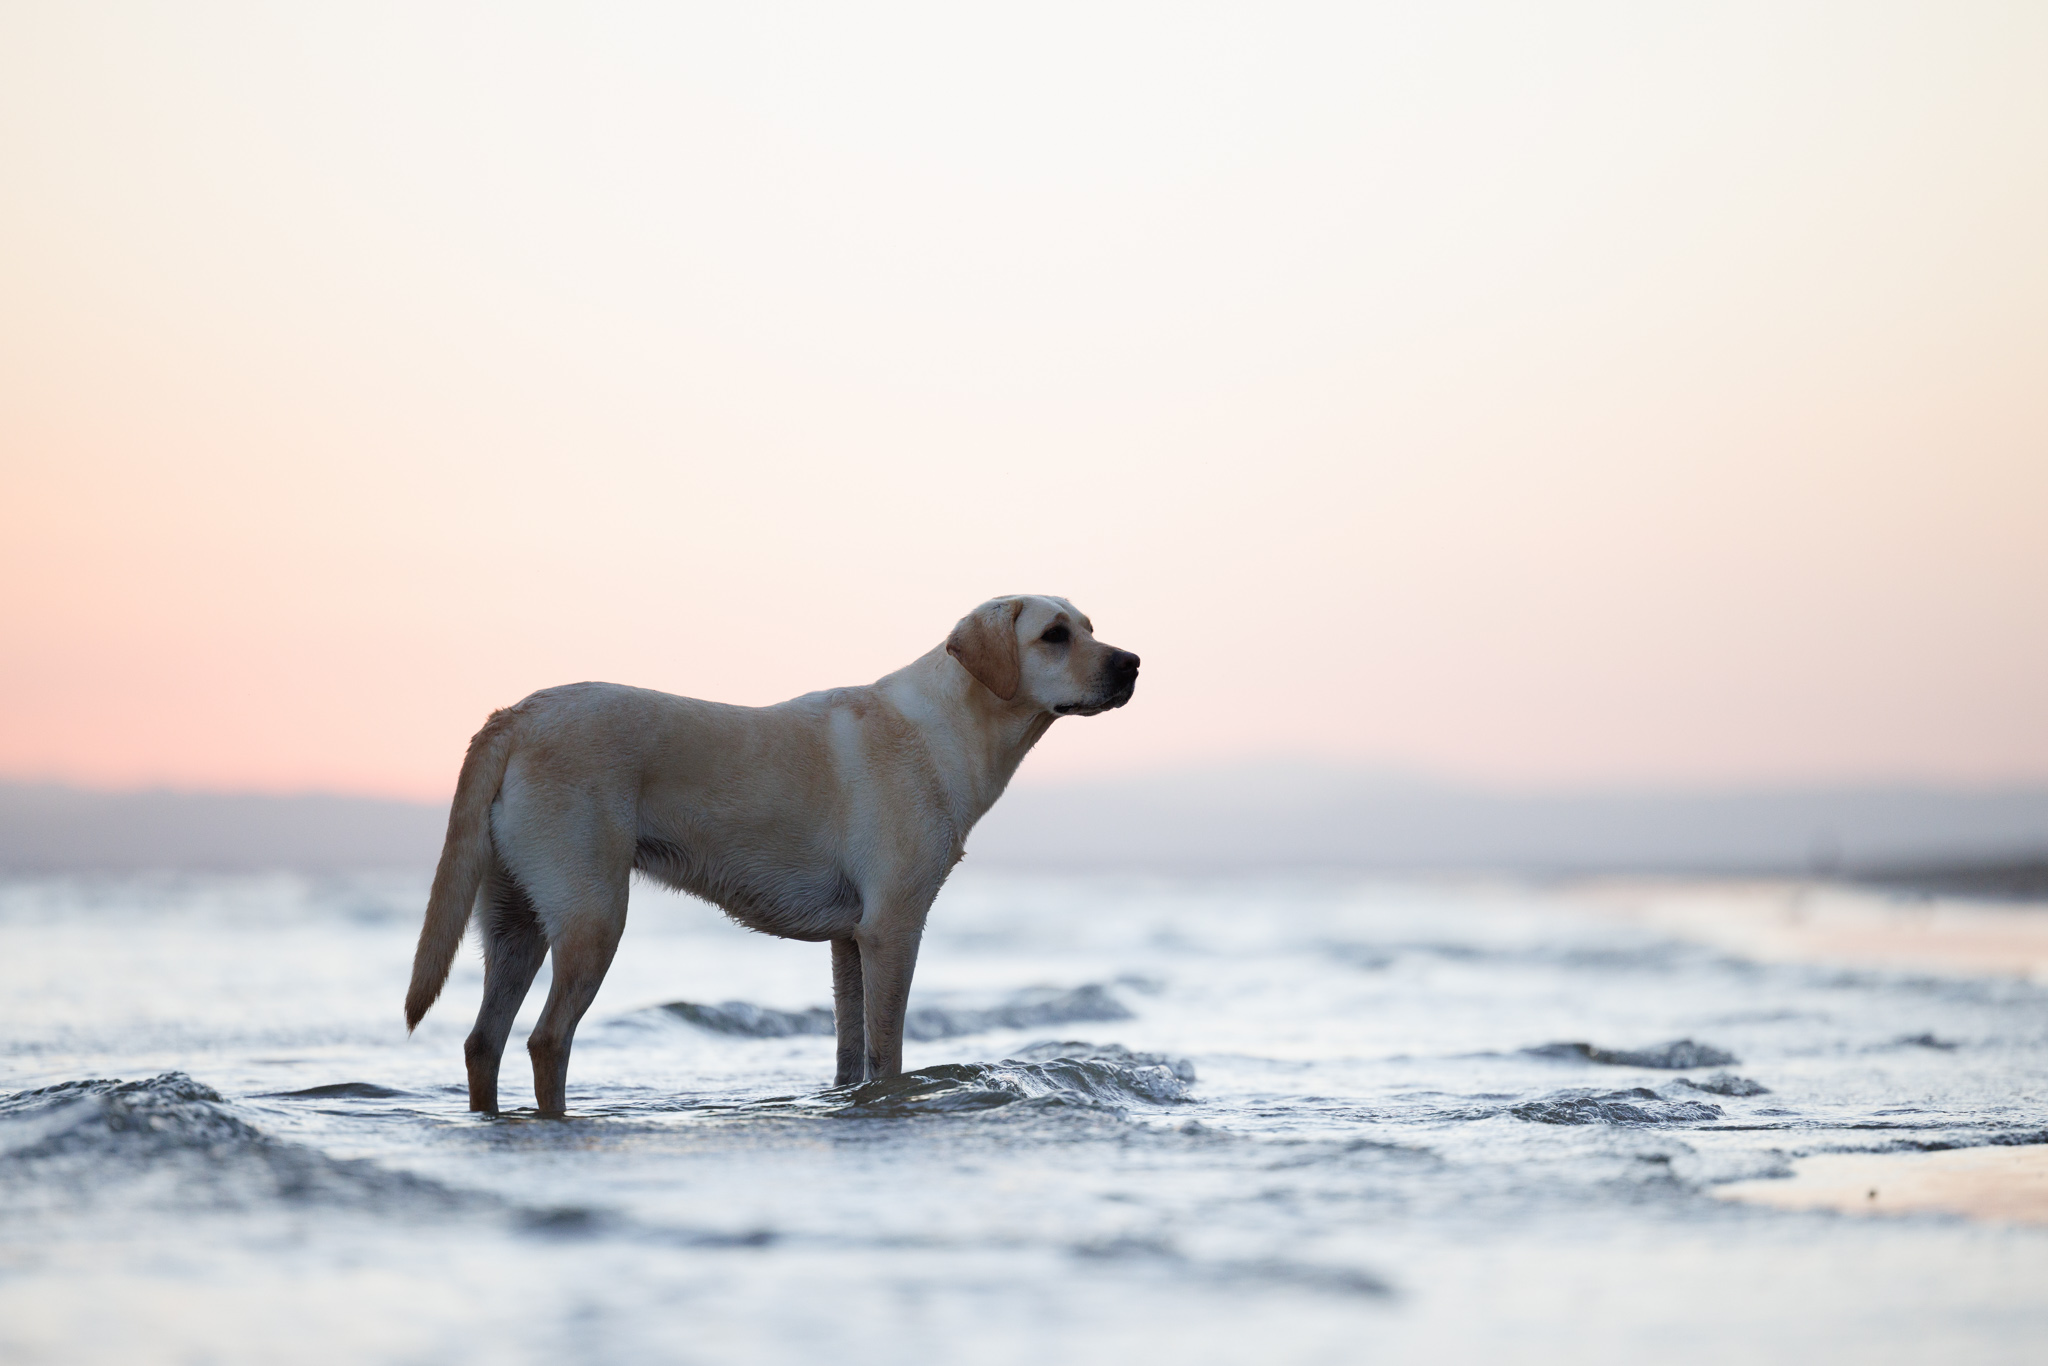
On this JPG export of my edit, I selected the weather of the RAW information to present this superbly smooth, heat picture. Elevating the shadows on the canine, adjusting the white steadiness to convey out the golden tones within the picture, the outcome feels calm and peaceable.
The RAW file, although? That’s nonetheless the identical because it was when it got here out of our digital camera. And our recipe remains to be there in Lightroom, able to bake as many extra duplicate JPGs as we would like. Or, if we resolve the following day that, really, the ultimate picture may do with a bit kind of of one thing, or we wish to go in a whole completely different route, we simply go into Lightroom, tweak the recipe and bake one other JPG.
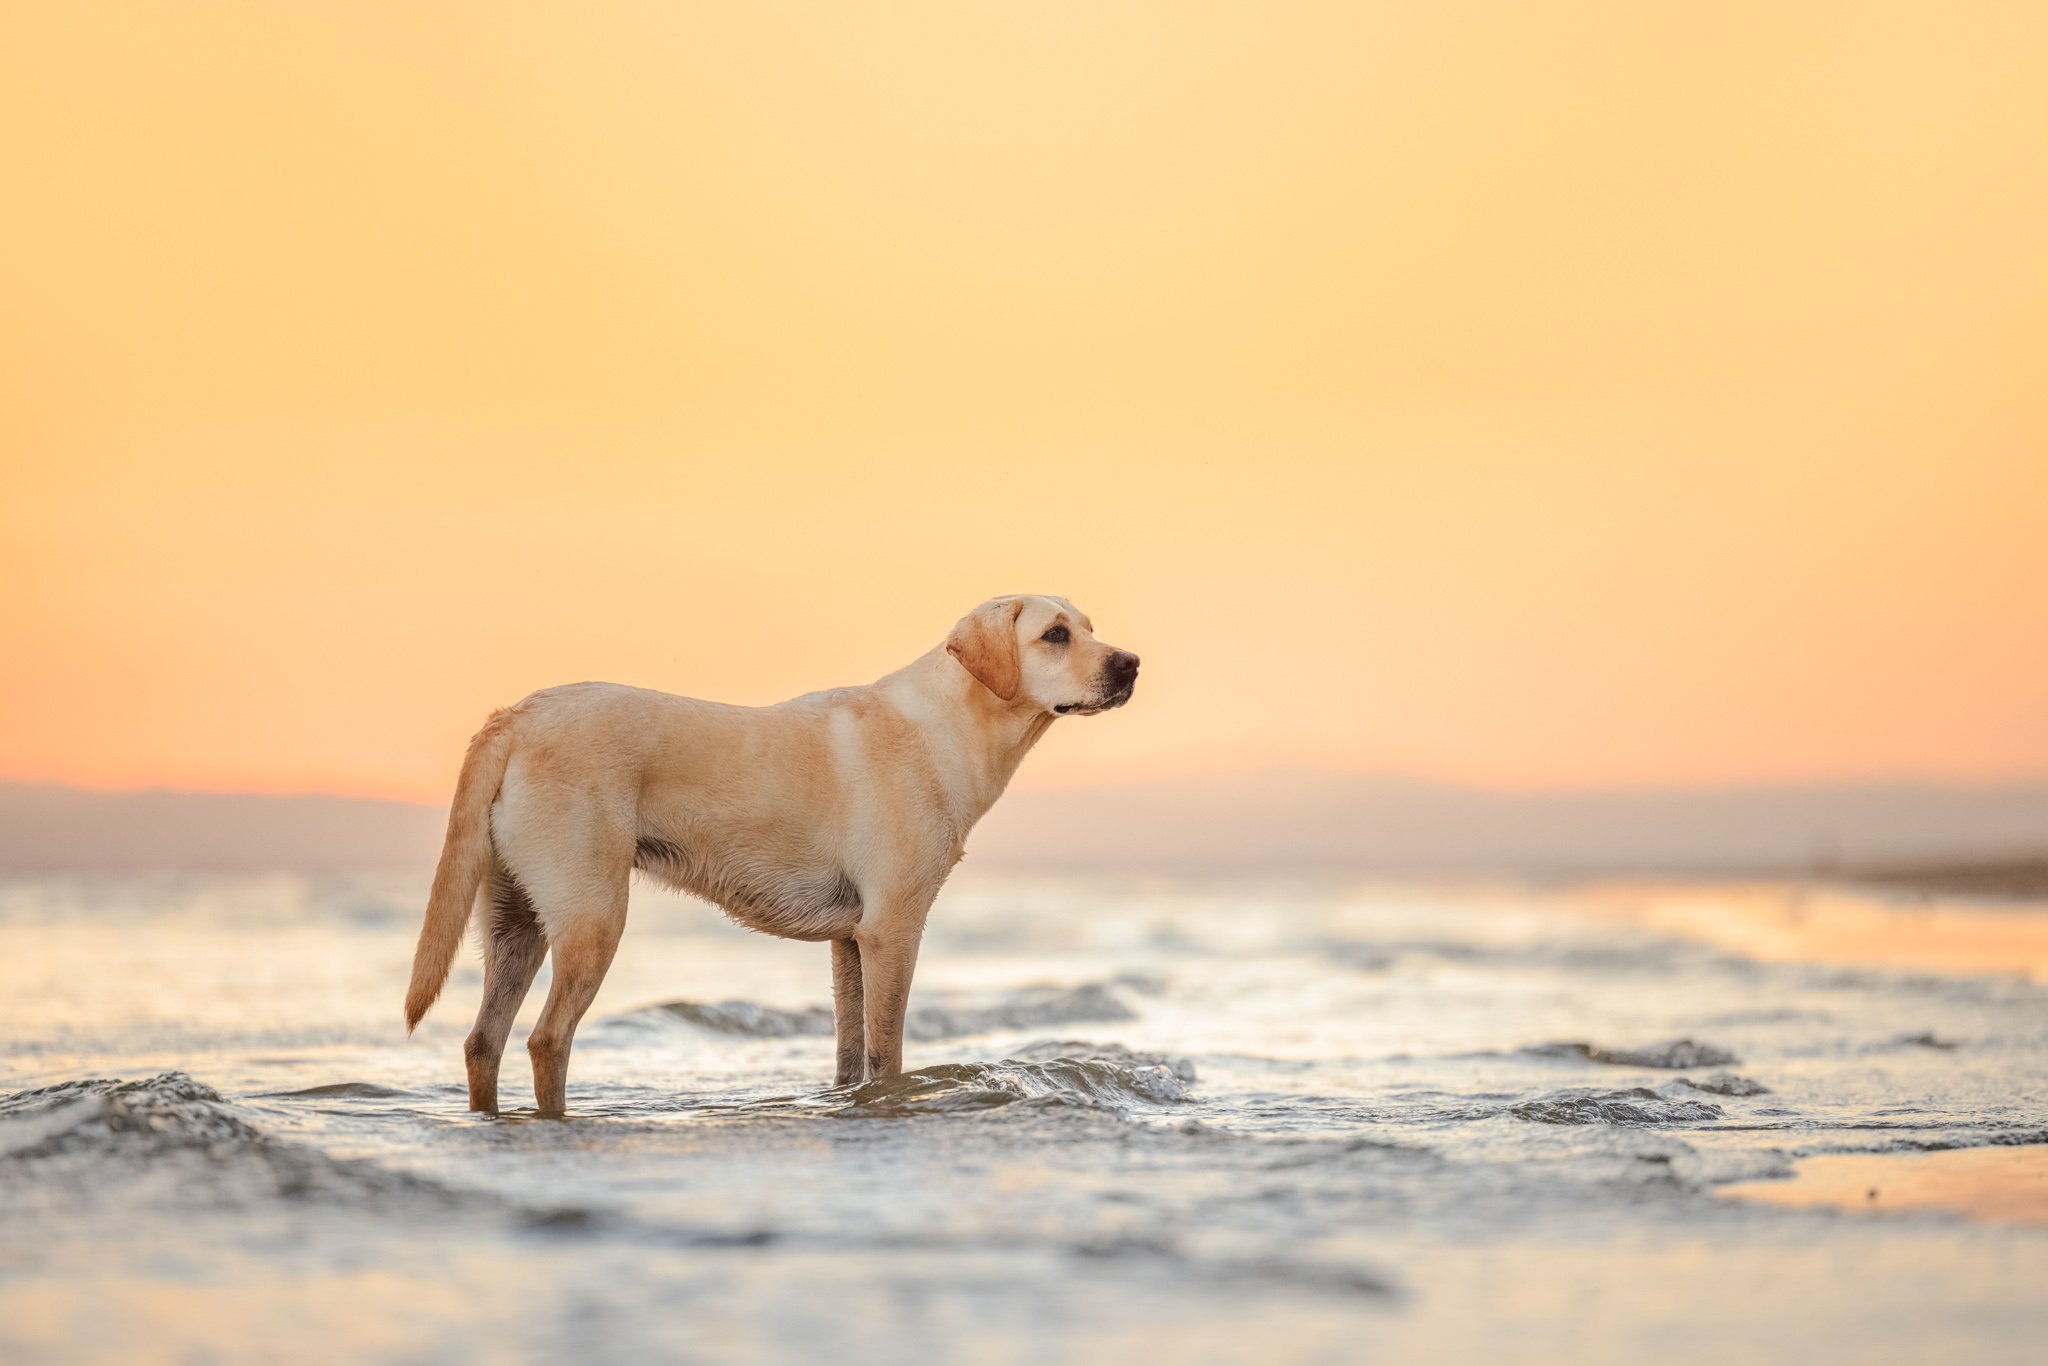
Making use of a unique “recipe” to the identical RAW substances fully modifications the texture of the picture. Which model is “actual”? They each are! The digital camera captured all the info proven in each of those variations, and I can select which substances to combine into the ultimate model: cookies or cake?!
Even smarter than that’s, for one RAW file, you’ll be able to select to have a number of recipes! You’re not restricted to 1 recipe per RAW file. There’s a characteristic in Lightroom referred to as Digital Copies which lets you make as many alternative recipe playing cards for any RAW file you need. However that’s a subject for one more day…
Since they embody allll the substances you would possibly presumably want in your recipes, RAW information are far larger in file dimension. This makes them extra cumbersome to share and most non-photographers gained’t have the software program on their pc or cellphone to even view a RAW file, a lot much less edit it. And, even those who do, each piece of software program that renders it could make it look completely different, as a result of that rendering software program is selecting the recipe!
And even when we had been to share the RAW, inform the opposite occasion to make use of the identical RAW editor as we do and supply the recipe for them (which might solely enable that single individual to see it as we do, and remains to be not shareable) – is that this one thing we actually wish to do? Does Mars give shoppers their recipes and permit them to provide their very own, barely tweaked, Mars Bars? Or do they imagine that the best way they’ve created their product is true to their imaginative and prescient and is the best way it ought to be loved? As photographers, we get to decide on precisely how our pictures ought to look, and sharing in a “baked” format similar to JPG lets us try this.
We all know you need to have some questions by now, so let’s dive into these.
How is it that we see a picture on the again of our digital camera, once we shoot in RAW, if RAW information aren’t really pictures?
It is a nice query and chances are you’ll have already got guessed a minimum of a part of the reply. The reply is that, to be able to show the picture in your display, your digital camera renders the RAW file to a JPG. In reality, this preview JPG is saved contained in the RAW file, alongside all the remainder of the info!
That rendered JPG is displayed in your digital camera’s display and used for the super-fast rendering of previews in software program like Photograph Mechanic. Totally different producers retailer this JPG in several methods, and it might not all the time be a full-size picture (Sony, we’re you), nevertheless it permits a preview of what you would possibly be capable to extract out of your RAW file.
Is the preview on the again of the digital camera a precise illustration of what’s within the RAW file then?
Properly really, no!
In your digital camera’s settings, you’ll have seen that you may select varied “appears to be like”. For Nikon, that is referred to as Image Management, Canon calls it Image Fashion, and Sony calls it Image Profile. The record varies between producers, however consists of choices like impartial (very flat-looking picture), portrait (designed to enhance pores and skin tones), and panorama (provides vibrant colors to panorama pictures).

On this Canon R5 digital camera, the choice is known as Image Fashion. It reveals you what changes every possibility makes to the RAW information to create the JPG preview, or “bake” into the JPG file in the event you select to not shoot in RAW.
You can too select further settings like lens corrections, noise discount and sharpness enhancement. Then, there’s white steadiness! Regardless of the white steadiness is about to when the picture is captured, shall be what you see utilized to the preview picture on the again of the digital camera.
When capturing in RAW, these settings are usually not really utilized to the RAW file, as a result of that will contain some baking, and we all know by now that RAW information are merely a set of uncooked substances. After we select these settings, we’re merely selecting how the photographs will look on the digital camera’s display, and what will get baked into that preview JPG talked about above. All of the uncooked substances are retained so we will bake them up nonetheless we like later.
But when we’re capturing in JPG solely, that one color profile needs to be proper for each picture we use it for, as a result of that’s the place we select if we’re going to be creating muffins, cookies, pancakes, or some random British dessert that needs to be drowned in custard earlier than it’s vaguely palatable. This recipe is being utilized and baked in-camera, and as soon as it comes out of the oven, there’s no going again. You get what you get, whether or not you prefer it or not.

Impartial is a really flat picture with little tonal distinction. Customary has only a contact extra saturation and “punch”. Take a look at the legs of the canine and also you’ll see how the Portrait profile has added in additional purple for pores and skin tones, and the Panorama profile has boosted the oranges – lots!
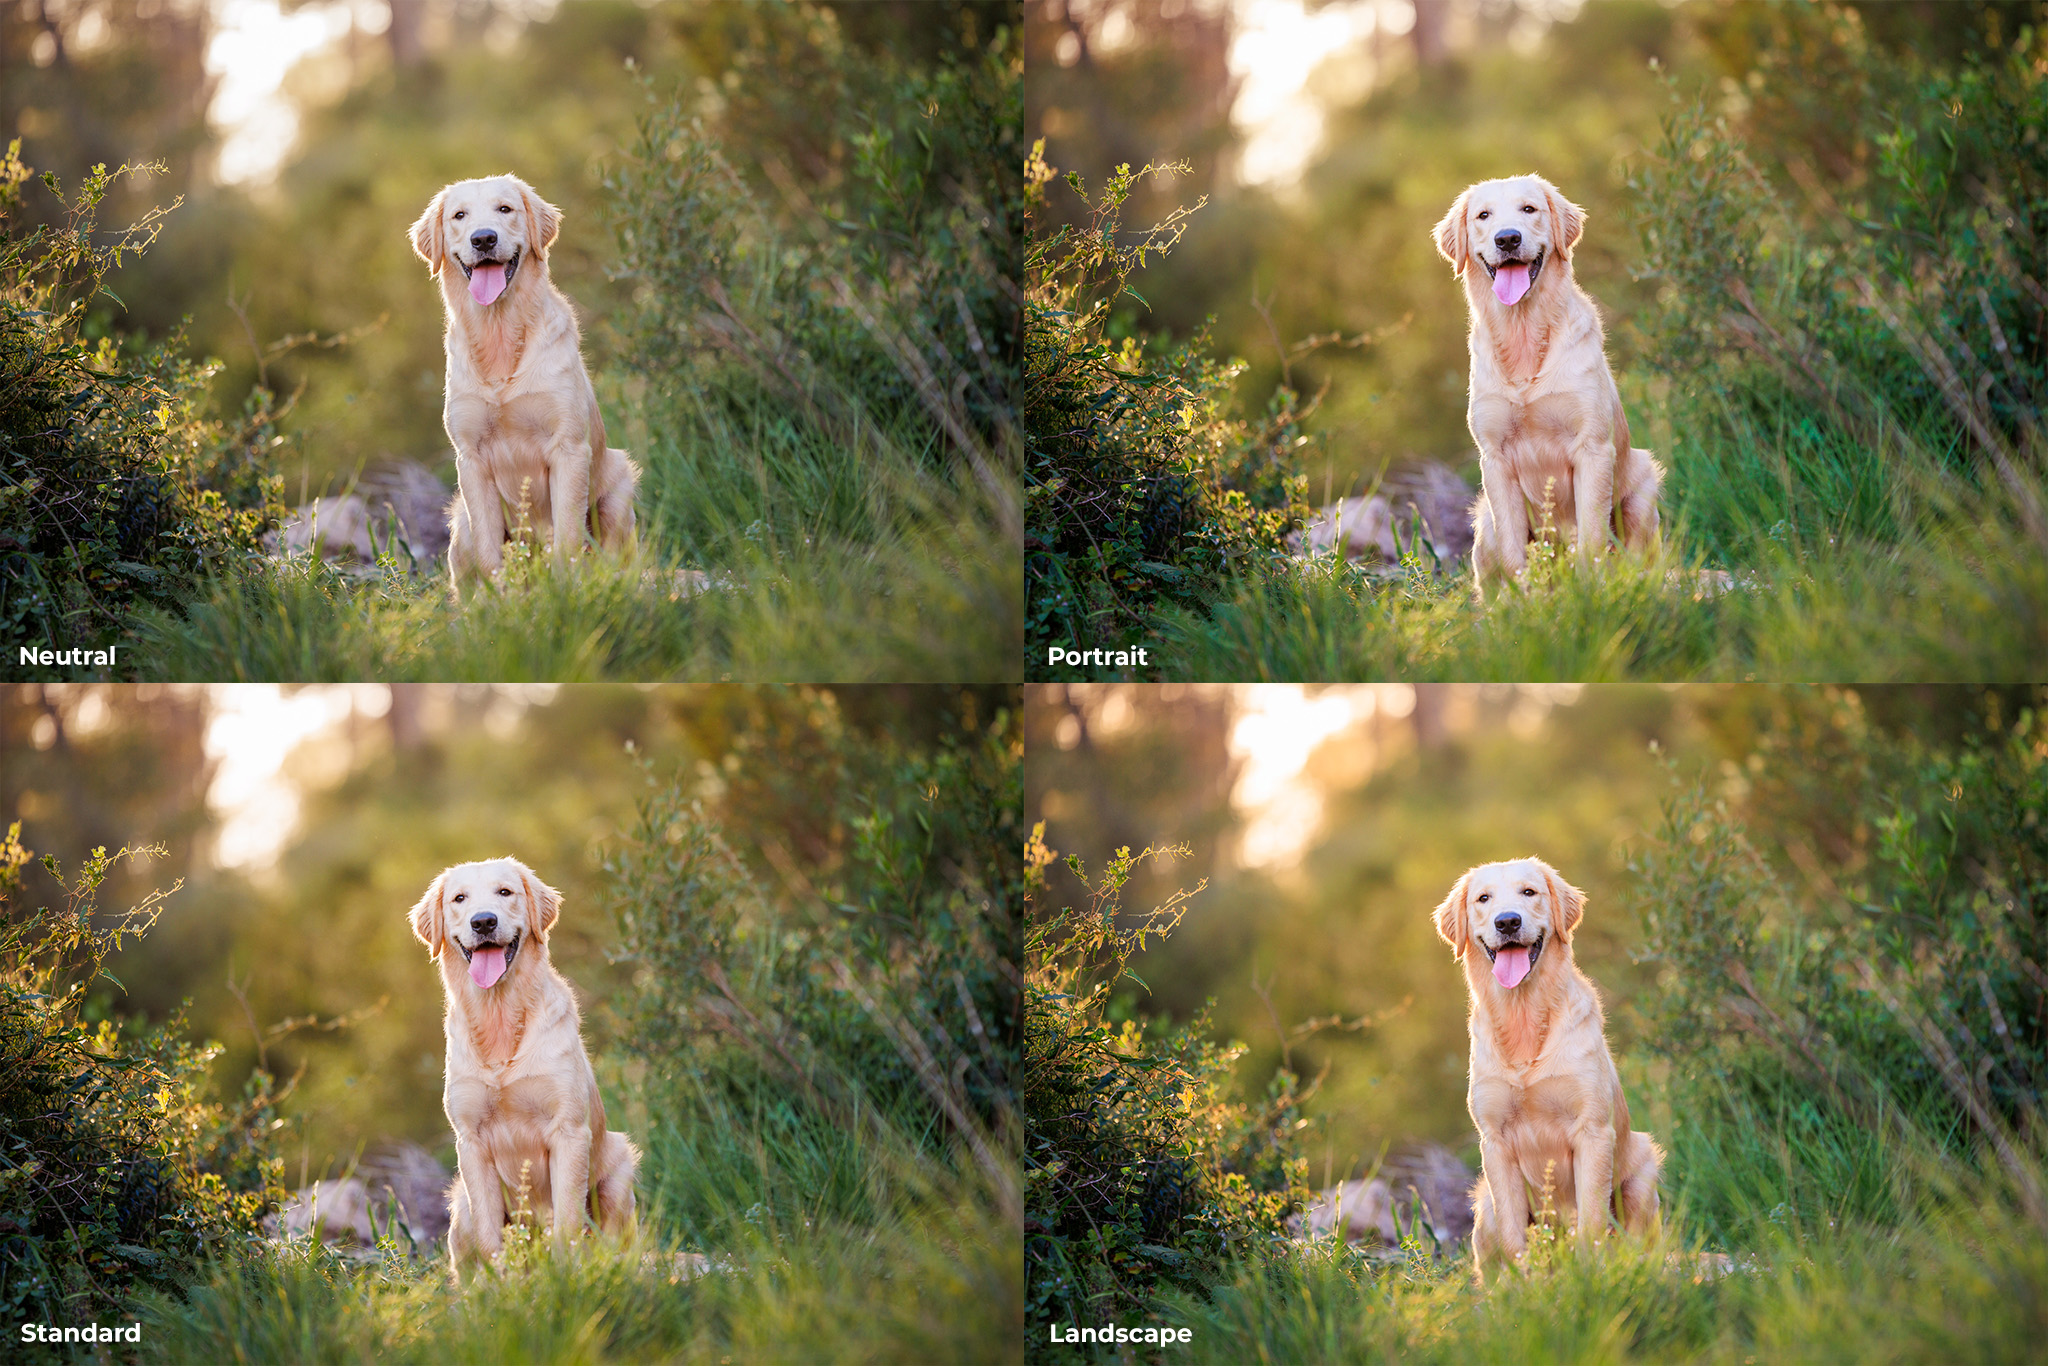
Once more, the Impartial profile offers us a really muted, flat picture. Customary is lots hotter and with extra distinction. Try the tongue within the Portrait model to see how this actually places a variety of further emphasis on pores and skin tones, and the canine total appears to be like a bit pink. Lastly, the Panorama profile has boosted the heat within the background, however has additionally over-saturated the canine, making her look far more pink/orange than she really is. In the event you shoot in JPG, considered one of these shall be your ultimate model. However with RAW, we will select any of them, and swap between them in Lightroom to decide on the perfect one on a per-image foundation!
So which color profile ought to I select?
In the event you’re capturing RAW, it doesn’t matter! You possibly can select the profile that you simply just like the look of finest on the again of your digital camera. Once you import your picture into Lightroom you’ll be able to have it routinely apply your favorite profile (learn the way to do that right here). If you wish to change this whilst you’re enhancing, you’ll be able to flick by means of all of the accessible profiles in your pc to see how your picture renders for each, and with no penalty. You get to decide on the recipe and tweak it to your specific style.
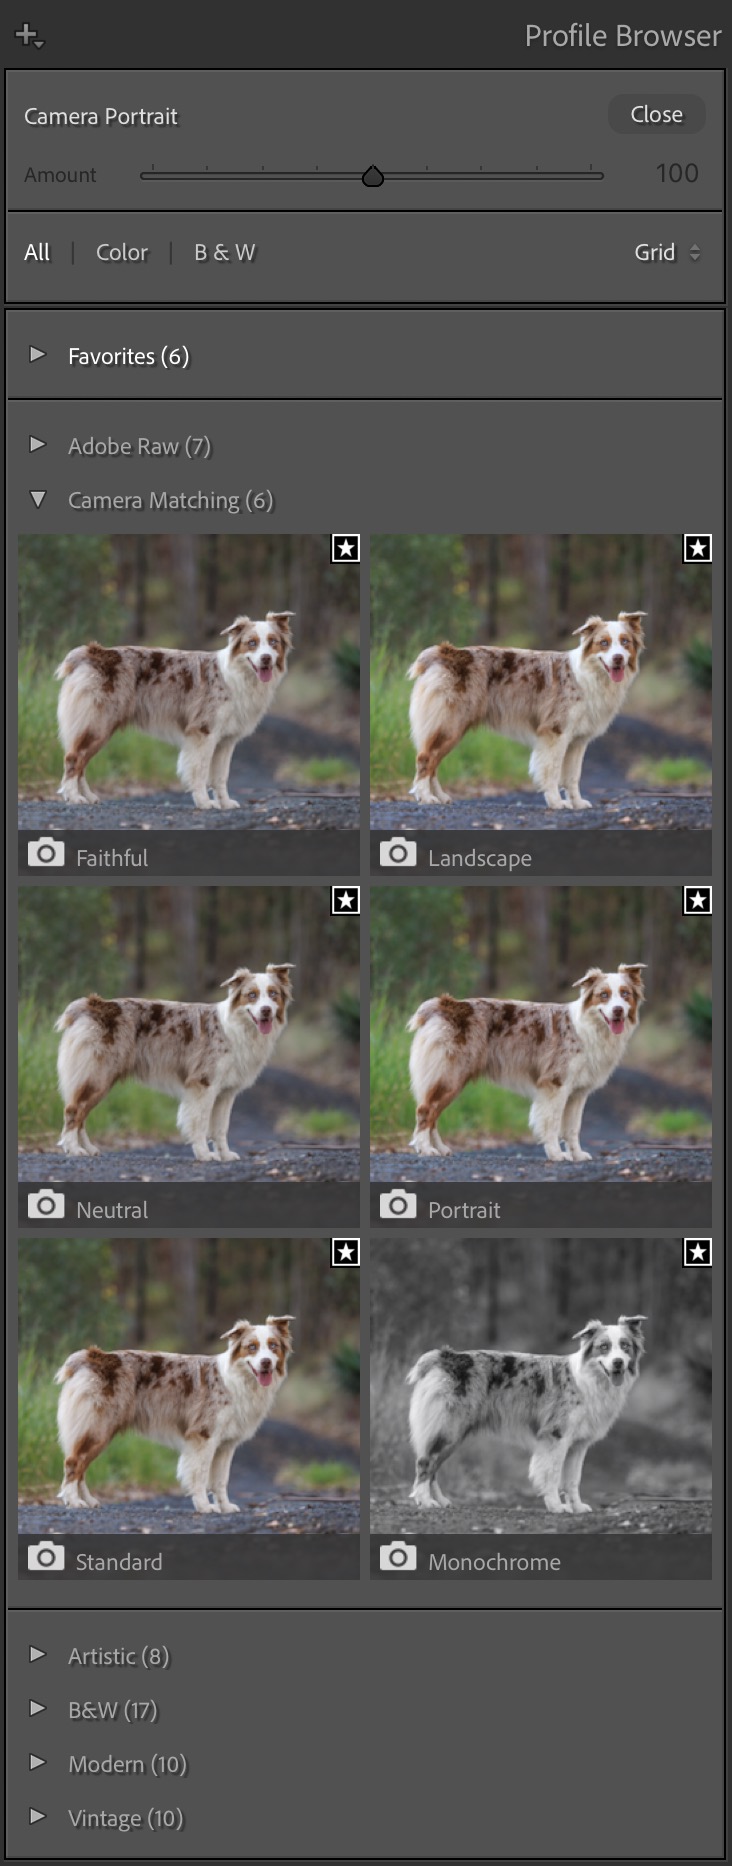
You possibly can preview how your picture will look with any of the profiles in Lightroom’s Profile Browser. Word that these aren’t presets, though could be simply confused with them. These are merely “recipes” on easy methods to current the RAW information out of your picture earlier than you begin enhancing.
In the event you’re capturing in JPG, nonetheless, it’s extra of a priority, since you’re baking in that recipe on the level you are taking the {photograph}. And which means if in case you have a landscape-specific profile chosen and then you definitely {photograph} an individual, they could look a bit orange, and there’s not a lot you are able to do to appropriate it after the occasion, as a result of that cake has already been baked, despite the fact that you might need really needed a muffin.
In fact, you can change your profile each time you {photograph} one thing completely different, however you continue to gained’t have the management to fine-tune the outcomes to your style. And don’t we now have sufficient to consider anyway?
This was shot in JPG with the Digital camera Portrait digital camera profile chosen. The greens are quite hideous and the nice and cozy tones are lemon-y, wouldn’t you agree? And really troublesome to repair when enhancing the JPG.

The identical picture shot in RAW, with the Digital camera Customary profile utilized in Lightroom. Way more true-to-life greens and the yellows/oranges are hotter and extra correct. Word additionally all the additional element accessible within the bokeh highlights. This is because of elevated dynamic vary within the RAW file.
And what white steadiness ought to I set the digital camera to?
Once more, in the event you’re capturing RAW, the white steadiness you select shouldn’t be set in stone within the RAW file. The uncooked information that’s captured consists of each attainable white steadiness “ingredient” so you’ll be able to change it to your coronary heart’s content material if you end up enhancing. No matter white steadiness you set, it’ll look tremendous correct and haven’t any lack of high quality and often no bizarre color casts. We largely simply depart it on Auto (AWB).
In the event you’re capturing in JPG although, beware! The white steadiness you set is baked into the picture and making an attempt to regulate it within the enhancing stage won’t give good outcomes.
This picture of Fletcher was shot in RAW on Auto white steadiness. It’s fairly blue (chilly) however because it’s a RAW file, it’s attainable to rapidly and simply appropriate the white steadiness in Lightroom.
Right here’s the corrected model. The one factor that’s completely different is the white steadiness. And the way way more true-to-life does the picture look now?
Right here’s the very same picture, however this one was shot in JPG. The white steadiness has been adjusted, nonetheless, it’s simply not attainable to get the identical “correctness” within the color with out introducing color casts. The Tint steadiness between magenta and inexperienced is particularly tough. Additionally, discover how a lot much less element there may be within the highlights (the intense areas of bokeh) and see the blockiness of the blacks in Fletcher’s face? That is because of the lowered dynamic vary of the JPG file straight from the digital camera.
However what if I don’t know easy methods to edit?
In the event you don’t know easy methods to use Lightroom or one other RAW file editor (and, let’s face it, no-one is born realizing), then it might be possibility to remain capturing in JPG for now. This can mean you can immediately have pictures that you may share. Undergo your digital camera’s profiles and select the one you want the perfect (we might advocate the usual one, however your tastes could range), and each picture you are taking shall be baked to that recipe. Simply be sure to have the white steadiness set as near appropriate as you’ll be able to.
In the event you assume that you simply may be desirous about experimenting with RAW information, however nonetheless need the comfort of prompt JPGs, then set your digital camera as much as have the perfect of each worlds by selecting the “JPG + RAW” possibility in your settings. With this chosen, each time you are taking a photograph, it’ll create each the RAW file and the JPG picture. In the event you begin to dabble in Lightroom, you’ll be able to experiment by seeing what modifications it’s attainable to make with the sliders on the RAW file in comparison with the JPG.
In the event you do wish to discover ways to edit your pet images, right here at Unleashed Training, we will help with that! We now have a tonne of sources, each free and paid, that present you step-by-step easy methods to use Lightroom and Photoshop to edit your RAW information and get superb outcomes.
And what if I don’t WANT to edit?
We hear this fairly frequently, that individuals don’t wish to create over-processed fantasies. We should always all get it proper on digital camera, proper? Proper. We’re not about to disagree with studying the talents to make a correctly uncovered, focussed, and composed picture in digital camera: that’s our jam! Past that, some individuals select to make use of extra creative licence in enhancing their pictures than different individuals do. In the event you’re somebody who strives for the “pure” picture, then this concept of not eager to edit could resonate.
Nonetheless, I’m going to burst your bubble just a bit bit: by capturing in JPG solely, you’re letting your digital camera resolve what that “actuality” appears to be like like. Revisit your profiles. You select a panorama profile and the greens are all of the sudden extra vibrant. You select a monochrome one and all the pieces is displayed in tones of gray. You select a portrait one and the pores and skin tones all of the sudden come to life. Which of those is “actuality”? It’s important to select as a result of your digital camera can’t. It might’t bake a JPG file and not using a recipe to observe.
Somebody far brighter than me as soon as advised me, “You’re smarter than your digital camera”. I’m nonetheless not completely positive if that’s true, particularly contemplating how rapidly digital camera expertise is progressing, however one factor that’s sure is that our cameras don’t understand how we really feel about any scene that we’re capturing. They don’t see the identical method we do – with all our senses, expertise, and feelings. A sensor shouldn’t be constructed the identical method as our eyes and mind, and so they can’t make the interpretations that we do once we’re immersed in a scene. The digital camera doesn’t know if we wish to emphasise distinction, saturation, or whether or not we really feel it as a extra muted scene. Our cameras can solely learn the sunshine hitting the sensor, they merely don’t expertise the second as we do.
By capturing in RAW, we get to make the picture look precisely the way it appeared to our eyes within the second.
After I shot this picture of Enzo, the late afternoon gentle was streaming into the backyard and his pet floof was warmly backlit. The RAW file doesn’t present that, nonetheless since all the info is obtainable within the picture, it was attainable to edit and “convey out” the nice and cozy, vibrant qualities lurking inside. The picture was intentionally underexposed to protect the element within the very vibrant highlights.
Within the edited model, Enzo is superbly backlit, with the rimlight round him not blown out and his fur completely white. There’s loads of color within the purple blossoms and the picture appears to be like heat and exquisite, however nonetheless true-to-life. Taking pictures this picture in JPG wouldn’t have preserved the complete ranges of tones current within the scene, making an edit like this not possible. You possibly can watch a part of this edit right here.
Want extra convincing that capturing RAW is the higher possibility in the event you plan on enhancing your pictures?
Let’s get our geek on and speak about bit depth.
Whereas this at first appears extra associated to arithmetic than artwork, it’s undoubtedly one thing that’s price realizing a bit bit about because it straight impacts the look and high quality of your pictures.
Bit depth, basically, pertains to the variety of colors that a picture can retailer. One bit equals two colors (black and white). With out getting slowed down within the particulars, a JPG picture is 8 bits and might retailer 256 tones on every of three “channels” (purple, inexperienced, and blue), for a complete of round 16 million completely different colors.
That will sound like lots, and it’s! It’s sufficient that JPG information typically look nice, with easy transitions in gradients of colors.
A RAW file, nonetheless, often has both 12 or 14 bits, which equates to over 68 BILLION or 4 TRILLION colors!! Now that’s a variety of colors!
This distinction reveals up markedly whenever you attempt to regulate distinction or colors (white steadiness particularly) if you end up enhancing the picture. With JPGs, you’ll usually find yourself with ugly colors or banding and posterisation results, particularly in areas of steadily altering tone, such because the sky.
So even the method of your digital camera saving the picture information to a JPG file instantly throws away billions of colors – colors that you can manipulate to create your superbly edited masterpiece!

Banding is current within the sky of this picture, which implies there’s simply not sufficient colors accessible within the JPG to present a easy transition of tones when the tones are edited. You possibly can keep away from this by capturing in RAW and doing all of your edits to the RAW file!
What’s “lossy” and the way is it dangerous?
Lastly – wowzers, this has been a protracted one! – comes the problem of file degradation. JPG information are what’s referred to as a “lossy” file sort. Each time you open, edit, and save a JPG picture, it is going to be compressed a bit bit extra, which means you’ll “lose” some information. So in the event you shoot in JPG, after which regularly shut and open your JPG in harmful enhancing applications like Photoshop, you’re killing the standard every time you re-save it. Over time, you’ll discover it turning into fuzzy or bizarre artefacts showing.
The identical shouldn’t be the case with a RAW file. In reality, whenever you manipulate a RAW file, you don’t really change the file itself in any respect, however quite one other file is created which holds all of the directions of the manipulations you’ve made to it – the recipe file. Solely when your recipe is utilized and it’s exported to an precise picture file for sharing that your edits are baked into the resultant JPG.
Your RAW file will stay in the very same pristine state because the day it was captured by your digital camera’s sensor. Now THAT is sensible!
To summarise, I believe it’s clear that we’re very a lot in favour of capturing our pictures in RAW format quite than JPG, as a result of doing so offers us a lot extra management of how the scene is interpreted by us, with out leaving that call as much as our digital camera. It offers us the flexibility to inform the story of our pictures extra exactly, and to evoke the identical emotions in these individuals viewing our pictures as we skilled on the time we captured them.
We actually hope that you simply loved this dialogue on the professionals and cons of RAW and JPG seize. Have we satisfied you to present RAW a attempt?
Any questions? Drop them in our Fb group!
Prepared to check your information? Full the quiz!
Begin your pet pictures journey with 100 free each day suggestions!
That is over 3 months price of each day suggestions protecting subjects like working with gentle, acquiring expression, digital camera settings, capturing motion, composition, utilizing the situation, canine dealing with tips – and a lot extra. Delivered direct to your inbox so you’ll be able to learn and soak up right away (no homework required).
We hate SPAM. We are going to by no means promote your data, for any motive.